Solar Projects
As part of my quest to learn about sustainable systems, I have made several projects over the years that are centered around solar power. Click a project's title to read more about it! (listed chronologically)
The Hack-Job Panel 
My humble beginnings. It was super hack job but it was a first start...

I made this panel kind of just to test a little solar phone charger that I made. I ended up running wires from the roof into my room so I could use it. It kinda worked, but the sun melted the hot glue that was holding the panels on to the board, so I took it down. It wasn't very sturdy anyway. However, the wire is still in place, and it came in handy when setting up a larger test system in the house (see below).
The SOLN1 
My rendition of laserhacker's SOLN1 (all in one solar system).

The SOLN1 was a great little panel. I saw the video about it on laserhacker's youtube channel, and decided to build one. I ordered all the parts online, except for the PVC and wires, because I could get that stuff easily. Oh, he also threw a free USB lightbulb into the box with the parts, which was super cool. I used this panel to charge my phone and the like whenever possible from when I built it in 2015, until the flexible PV panel stopped working reliably in 2018. It is unfortunate, but understandable that the plastic panel eventually developed a loose internal connection between solar cells. I suppose this is the tradeoff for reducing weight and ease of install.
Dispite this setback, the panel hasn't gone to waste! See "Home Solar Setup V1" below.
Island Solar Setup 
I built a semi portable solar power system for a family friend who has a cottage on an off-grid island.
 The Story
A while back, we were invited to stay with some family friends in their off-grid island cottage. I decided this was a perfect time to bring along the SOLN1, which I did. When we got there, one of the aforementioned family friends was so impressed by it that she asked me to build her one. As it turned out, she had purchaced a used solar panel a year or so prior, intending to set it up on the cabin, but not knowing exactly what she needed. Convieniently, having just built a system, I knew what was necessary to get her panel producing usable power. Eventually, she dropped off the panel and an inverter she had bought at my house, and I dove into the mystical land of Amazon.com to find the remaining parts. I designed the box to hold it all on the computer, then redesigned it to be more compact when my dad and I actually went to build it. Then we built it, I installed the components and wired it up, and it was (pretty much) done.
How it worksThe panel is set up with a stand and the cable is plugged into the back. The cable uses SpeakON connectors because they are substantial and lock in place. The other end of the cable is plugged into the input on the box. This is connected to the input of the change controller. The charge controller is mounted on a hinged board which can be flipped down during transport and up during use, so you can see the voltage of the system. The charge controller charges the battery (you don't say), and regulates the power from the battery to the output. The output is connected to the 300w inverter as well as a 12v socket.
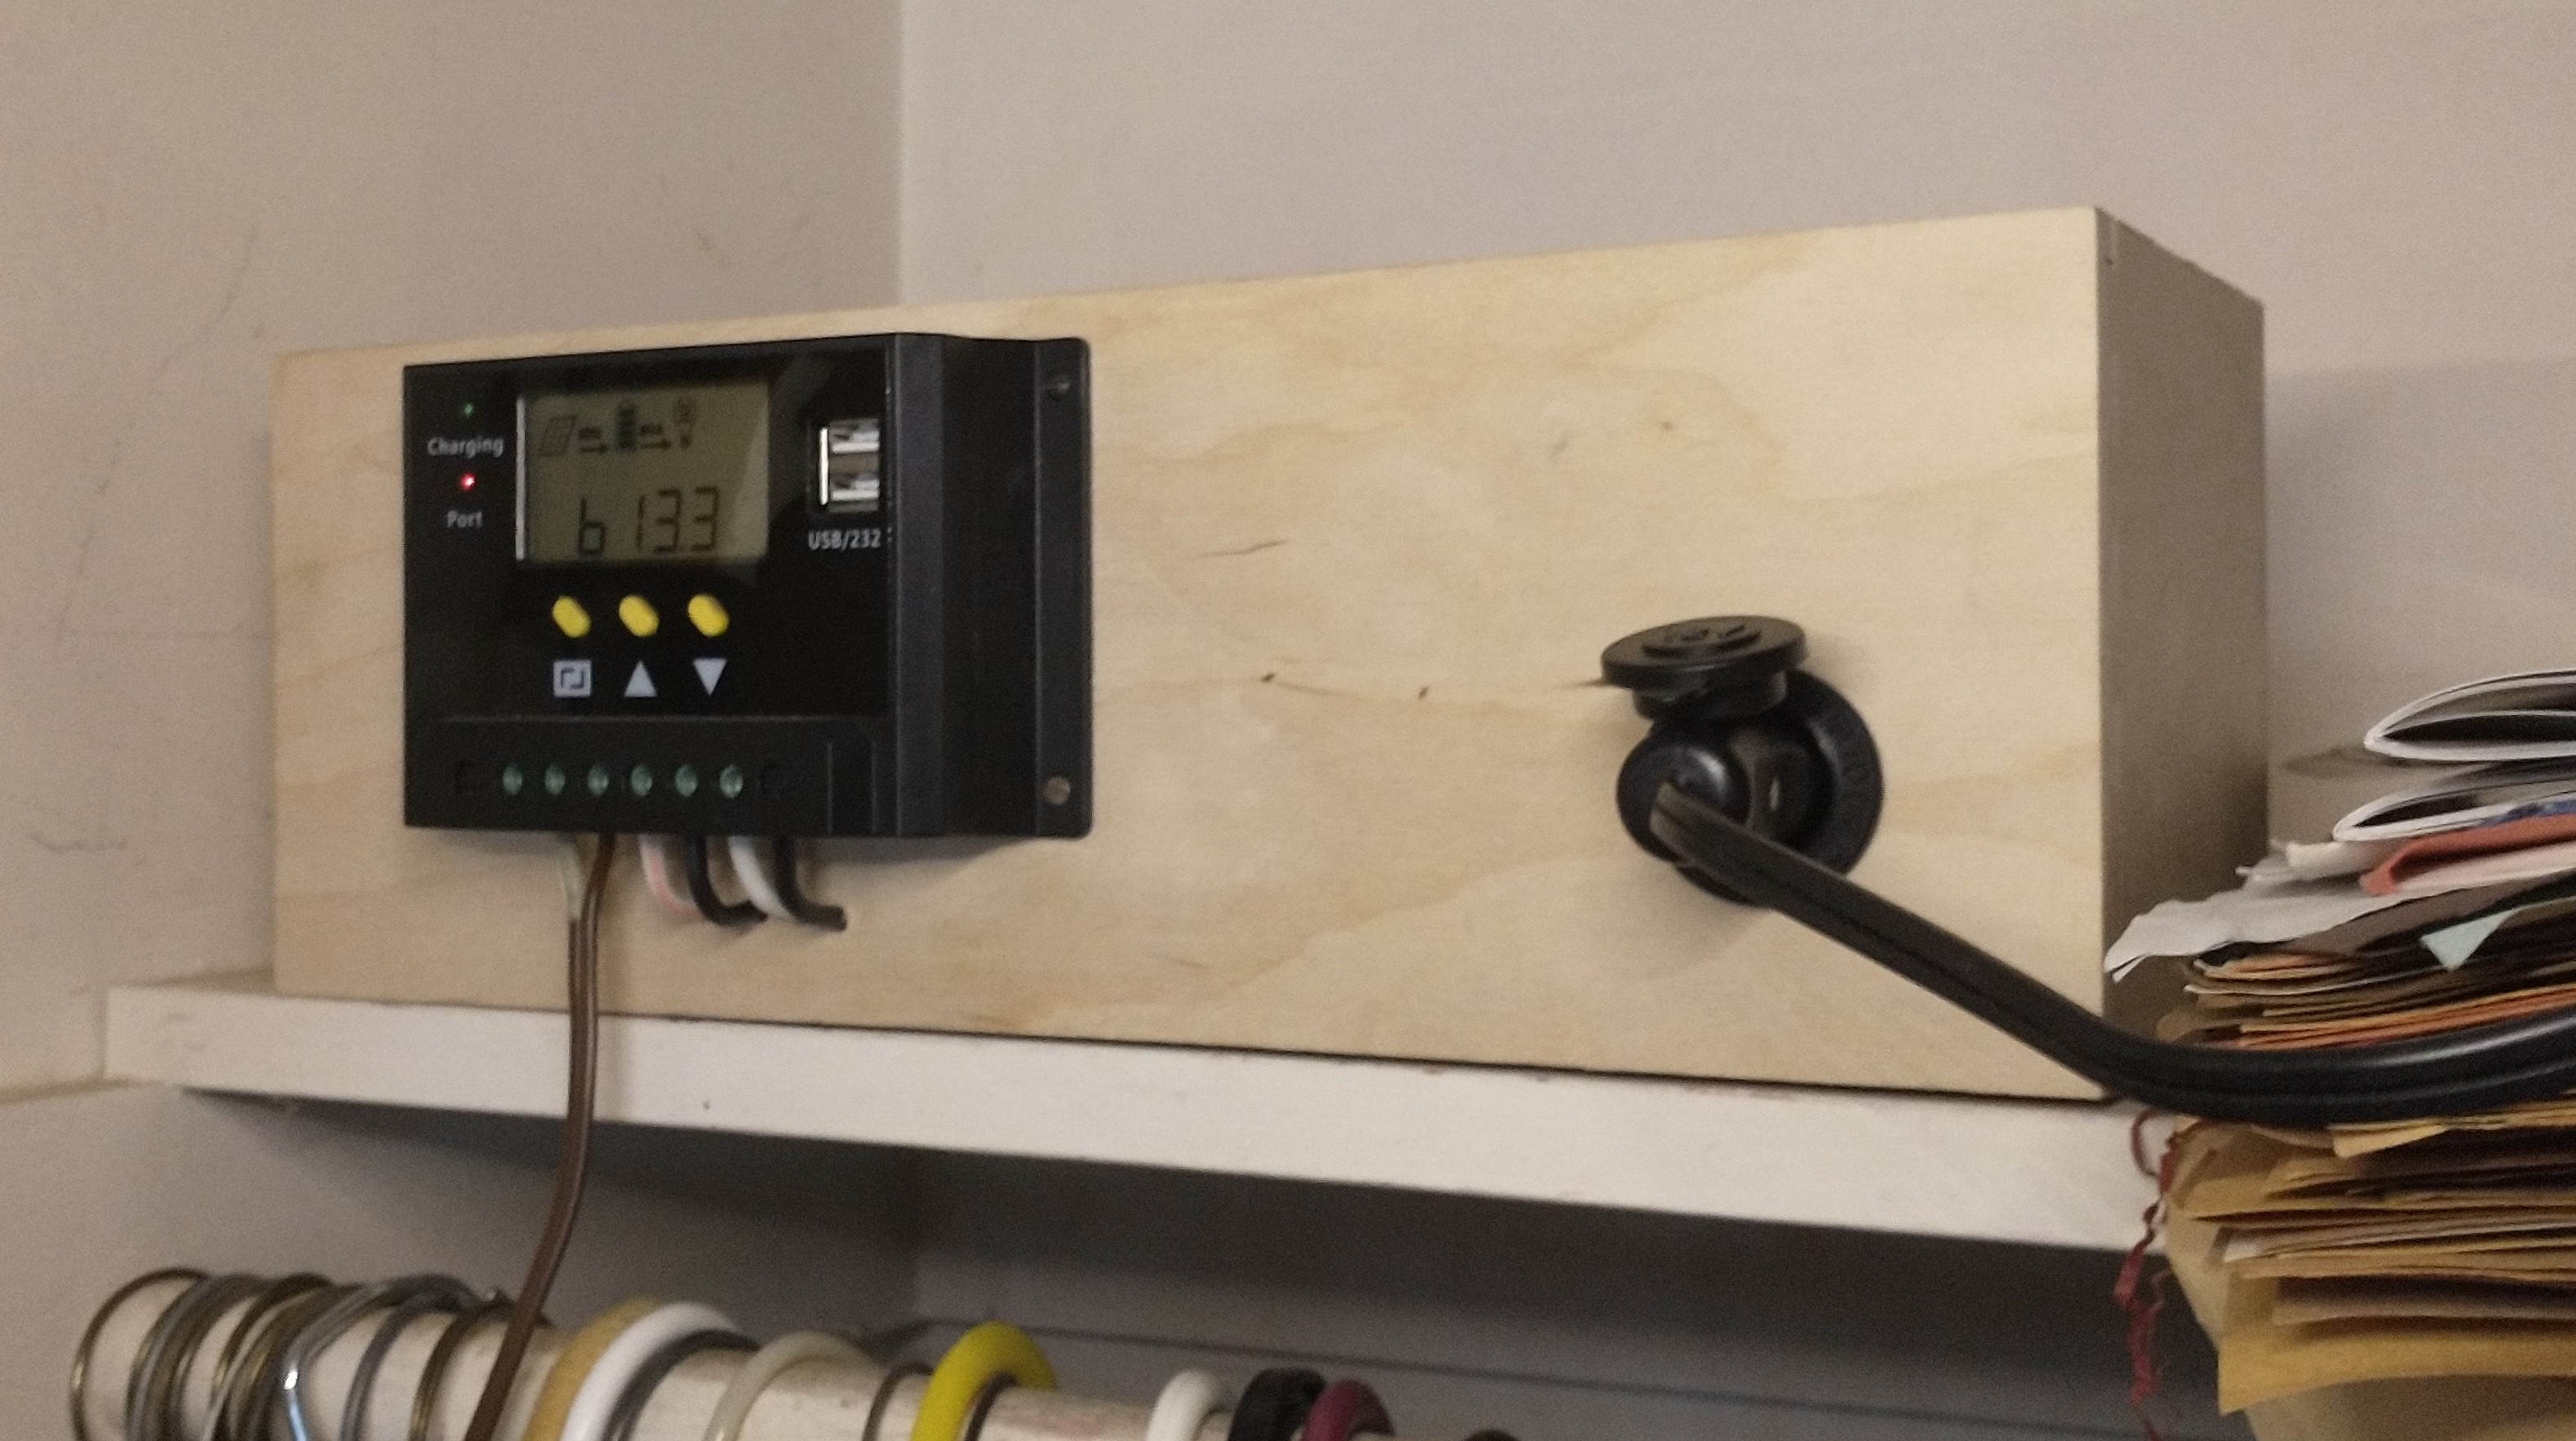
Despite a couple issues stemming from them forgetting to disconnect the battery while the device was stored over the winter, they now have the procedure fully figured out and used it for many summers. Eventually, it was succeeded by a Jakiper portable power station, as such units have since become far more available than they were when I first built this device. Nonetheless, my unit has now been designated to power the exhaust fan on the new composing toilet, and so lives on a shelf in the bathroom.
Home Solar Setup V1 
I set up a semi-temporary solar power system at the house to experiment with.
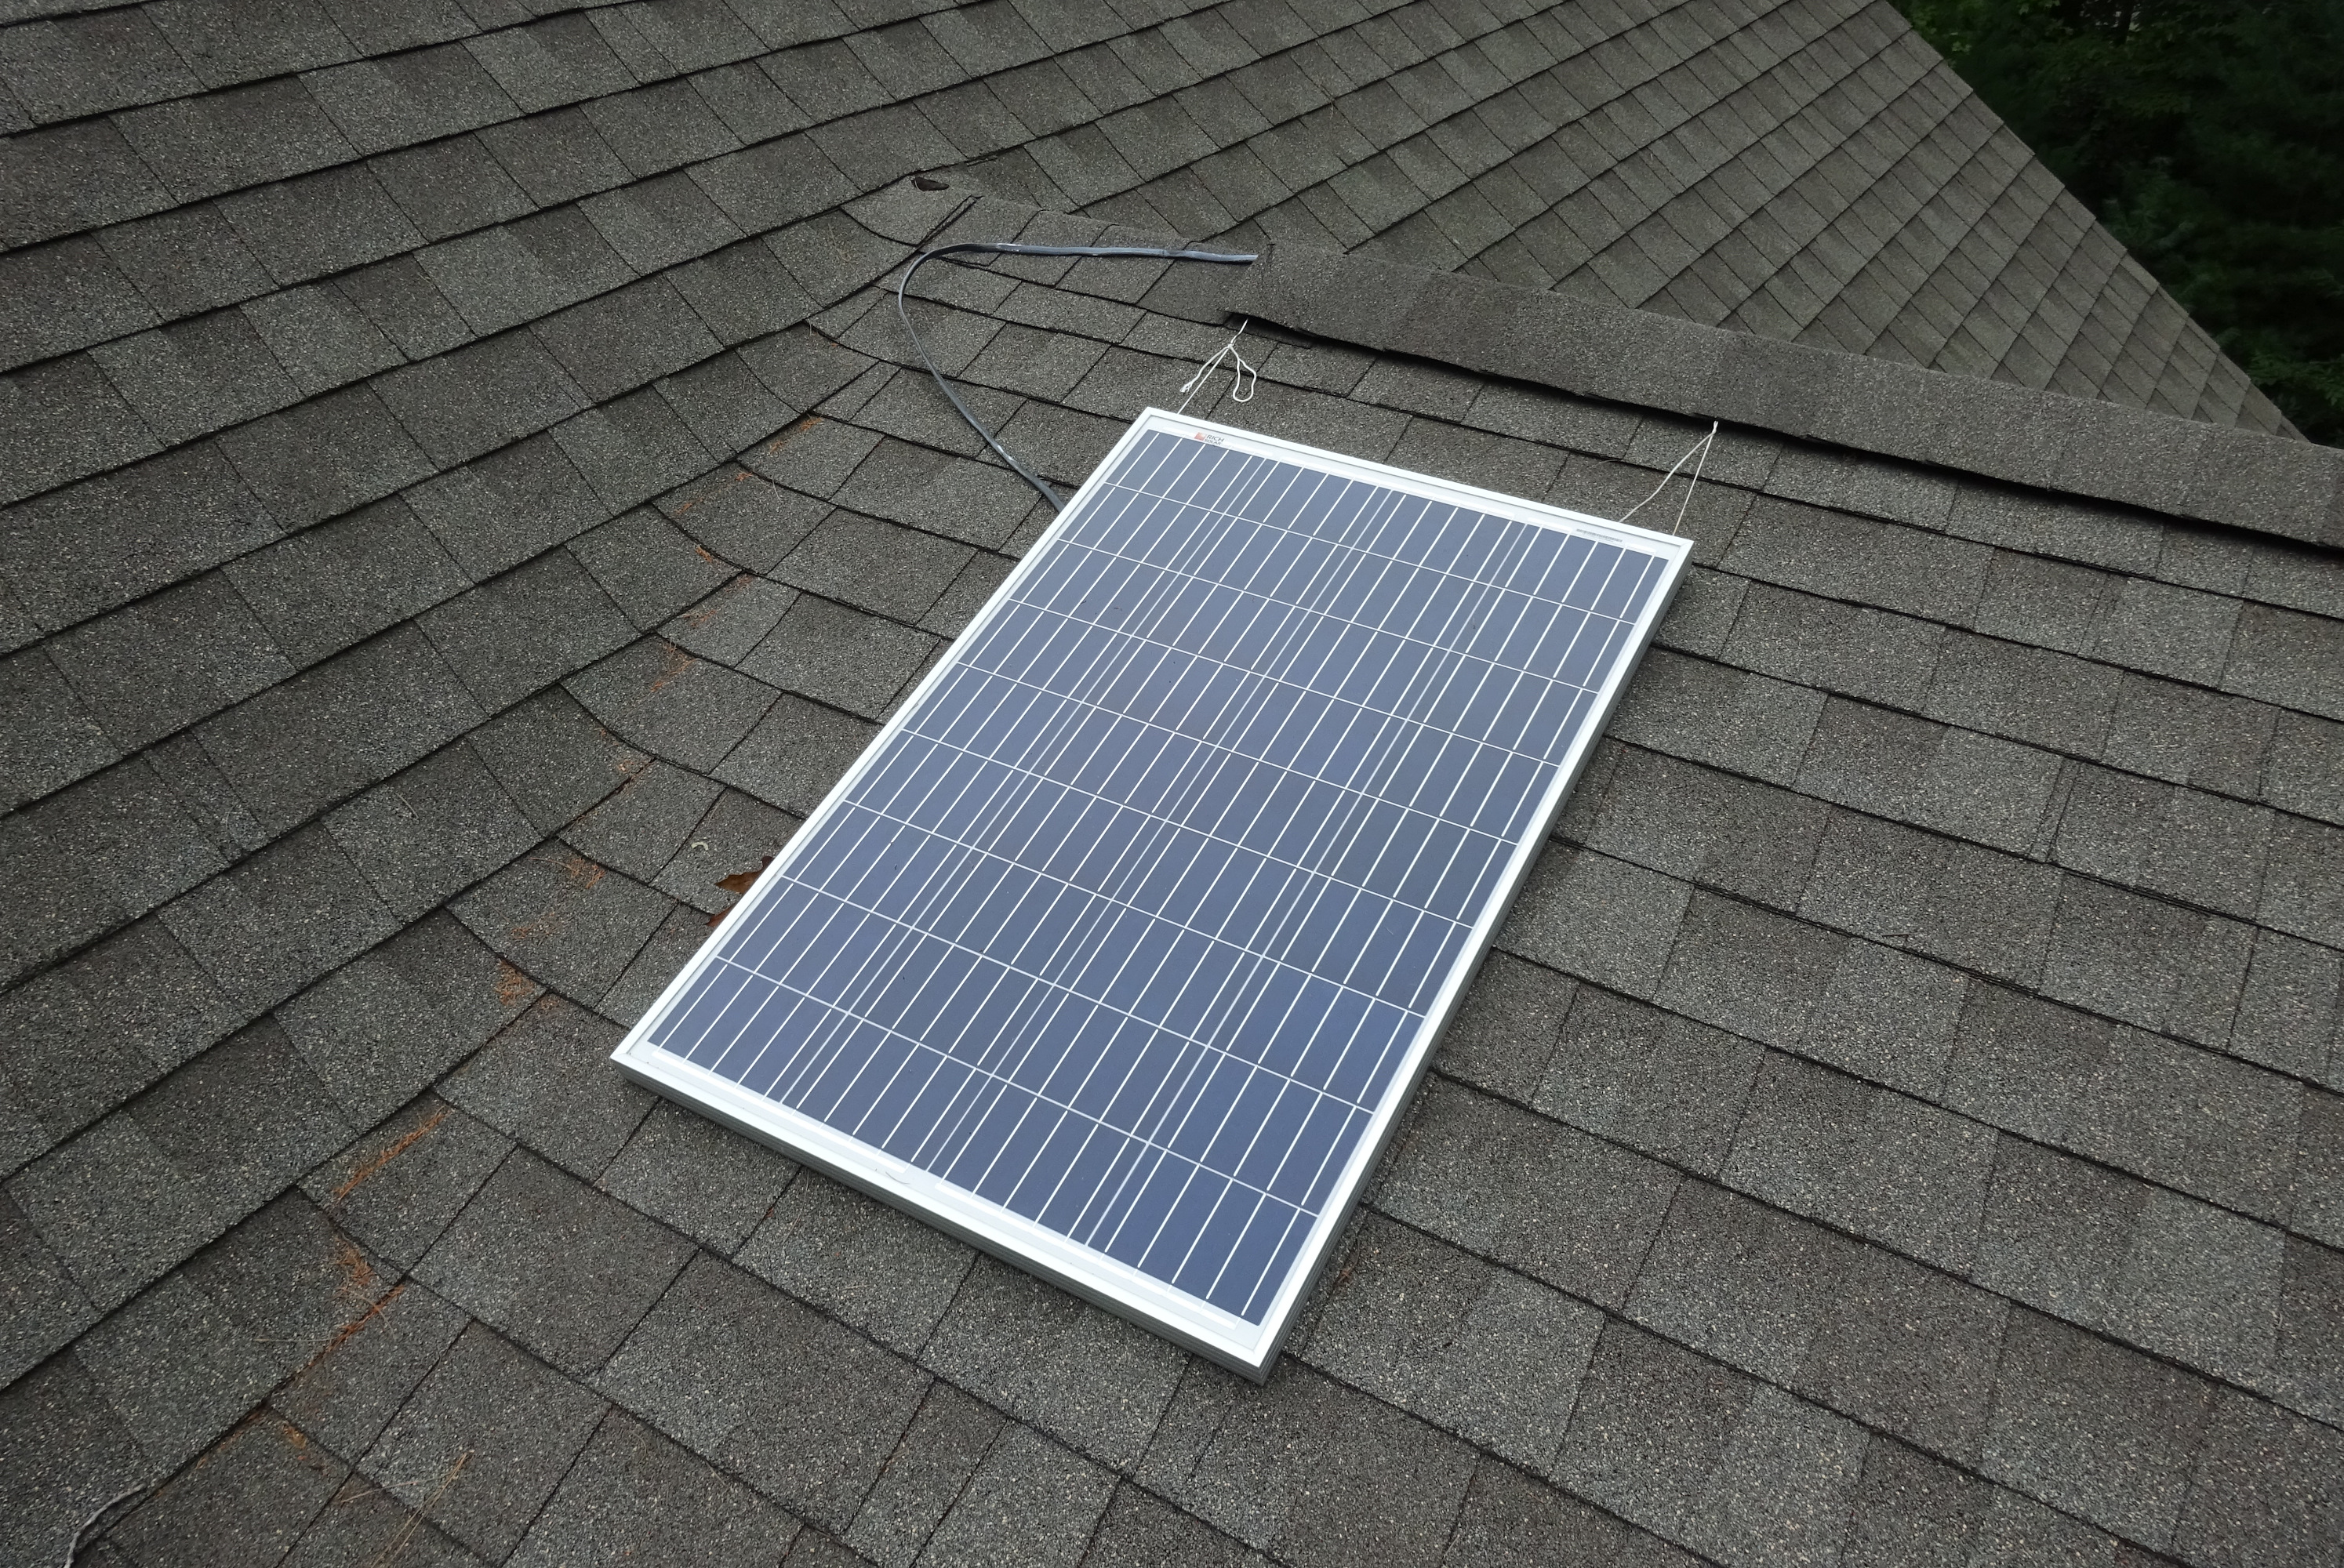
The setup was pretty simple but I was nonetheless able to power all my devices (phone, computer, etc.) and light my room. I bought a 100 watt panel off Amazon and hooked it up to the wire that I ran through the roof back when I set up the hack-job panel. The flexible panel of the SOLN1 had stopped functioning reliably so I commandeered it for its batteries and charge controller. I stuffed it in my bedroom closet, where the other end of the wire from the panel emerged.
This also demonstrated that small scale solar power was viable on the house. There's plenty of space on the roof beside the 100W panel for additional panels. (I hoped to take advantage of this eventually, but later, more complete measurements would dissuade me.)
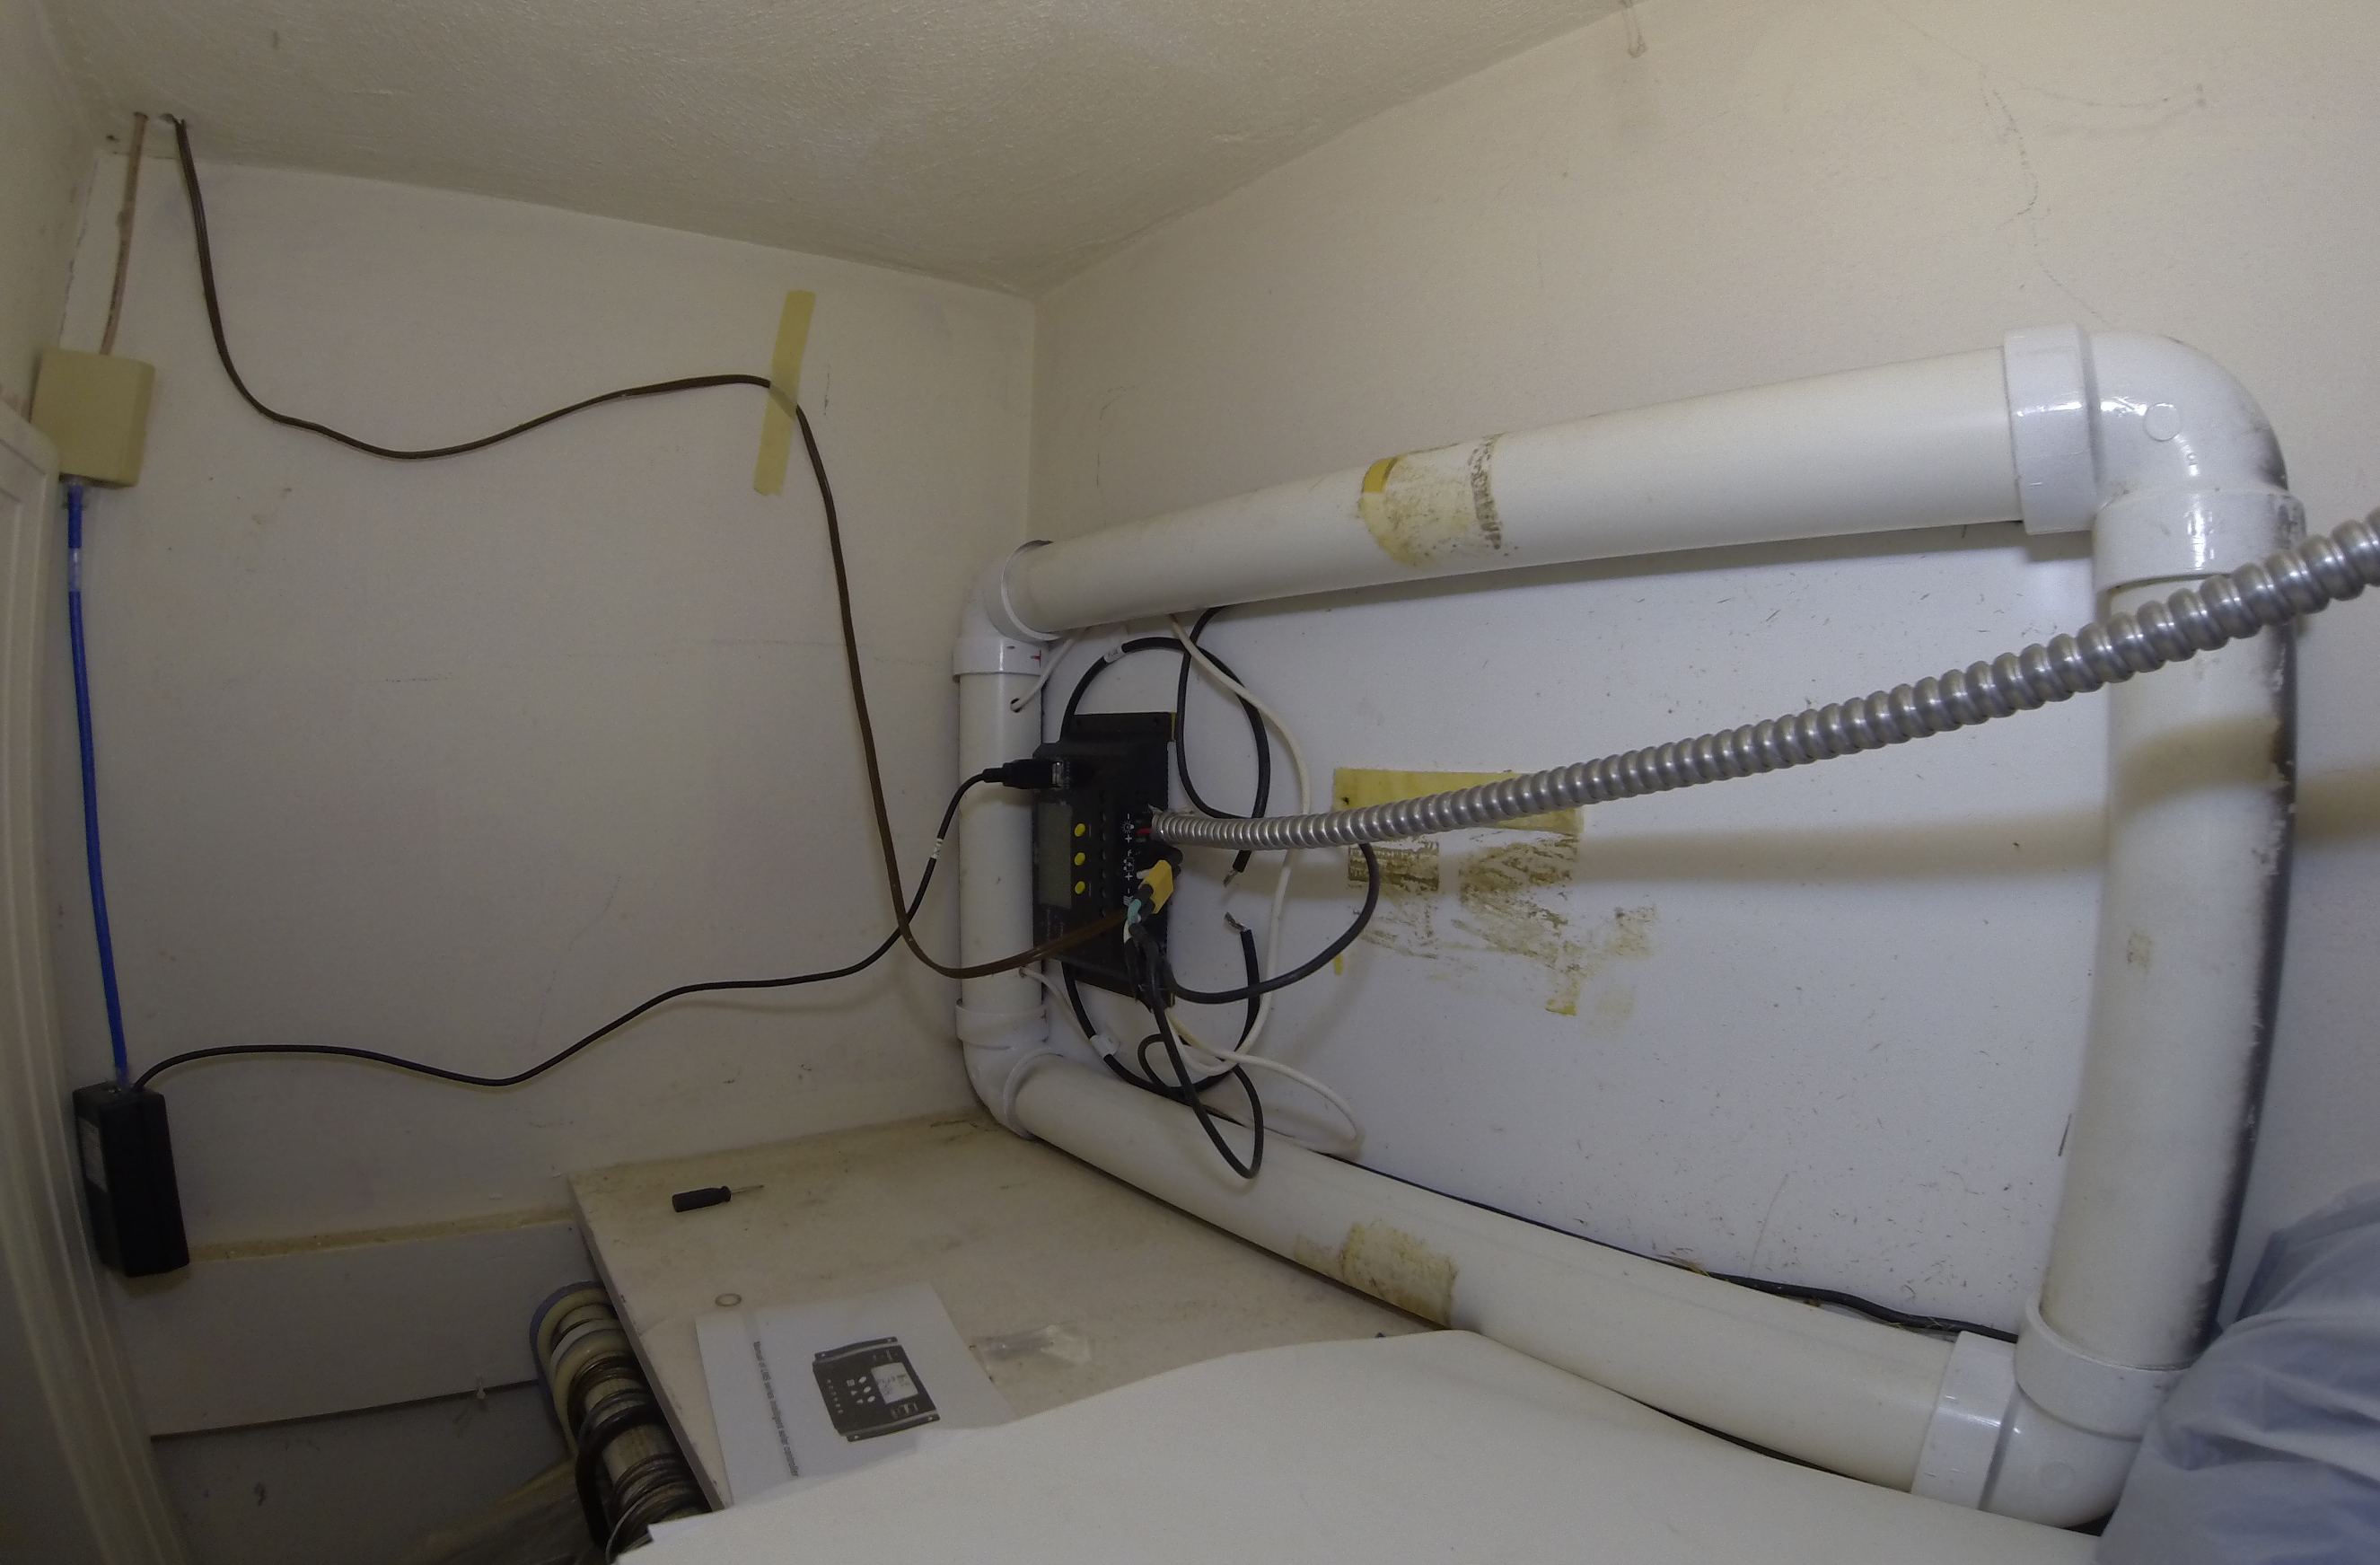
The brown wire coming out of the ceiling comes from the panel. The tan wire next to it is ethernet, and the black box it runs to is a wifi extender I made using a raspberry pi, which is powered from the SOLN1, as you can see. The 100 Watt panel charges the SOLN1's batteries quite quickly and I actually have an abundance of power at the rate I'm currently using it. The metal-clad cable running out of the right of the frame went to the inverter that was originally attached to the back of the SOLN1, now positioned just outside my closet door. This is where I pluged in my computer charger and/or any USB devices I felt like charging. It worked quite well for several years, until July of 2021, when I discovered some problems. In solving them, I ended up creating V2, see below.
Home Solar Setup V2 
I was preparing for a road trip which involved camping, and wanted to have a source of electricity on my travels, so I extracted the SOLN1 from my closet. This is when I discovered that at some point in the prior 6 years of its existence, one of the eight LiFePO4 Headway cells had leaked and gone dead, effectively disconnecting the other three that were in series with it (which thankfully remained undamaged). However, because the batteries were connected in two parallel sets of 4, the functional set masked the fact that half had stopped working.
So, with mere hours until I had to leave, I quickly took it all apart and stuffed the functional parts into the back of my car. Thankfully, they served me flawlessly during my trip. Upon returning home, I repackaged my temporary back seat setup into a wooden box that was lying around, and thus the pieces of the SOLN1 were given a new life once again.
Finally, I stuffed the new box back into my closet and hooked it back up to the panel on the roof, and so the now rather semi-permanent house setup was back in action. Unfortunately, the 100w panel started malfunctioning about three days later, so I swapped it out for a functional 50w panel (100w was overkill anyway), and now everything is back in operation. I suppose frequent repairs are the price of using old equipment.
Epilogue
When I moved (see Apartment Setup below) this came with me, and is now a backup system for light loads, powered by a 100W panel hanging outside my window.
Little House Setup 
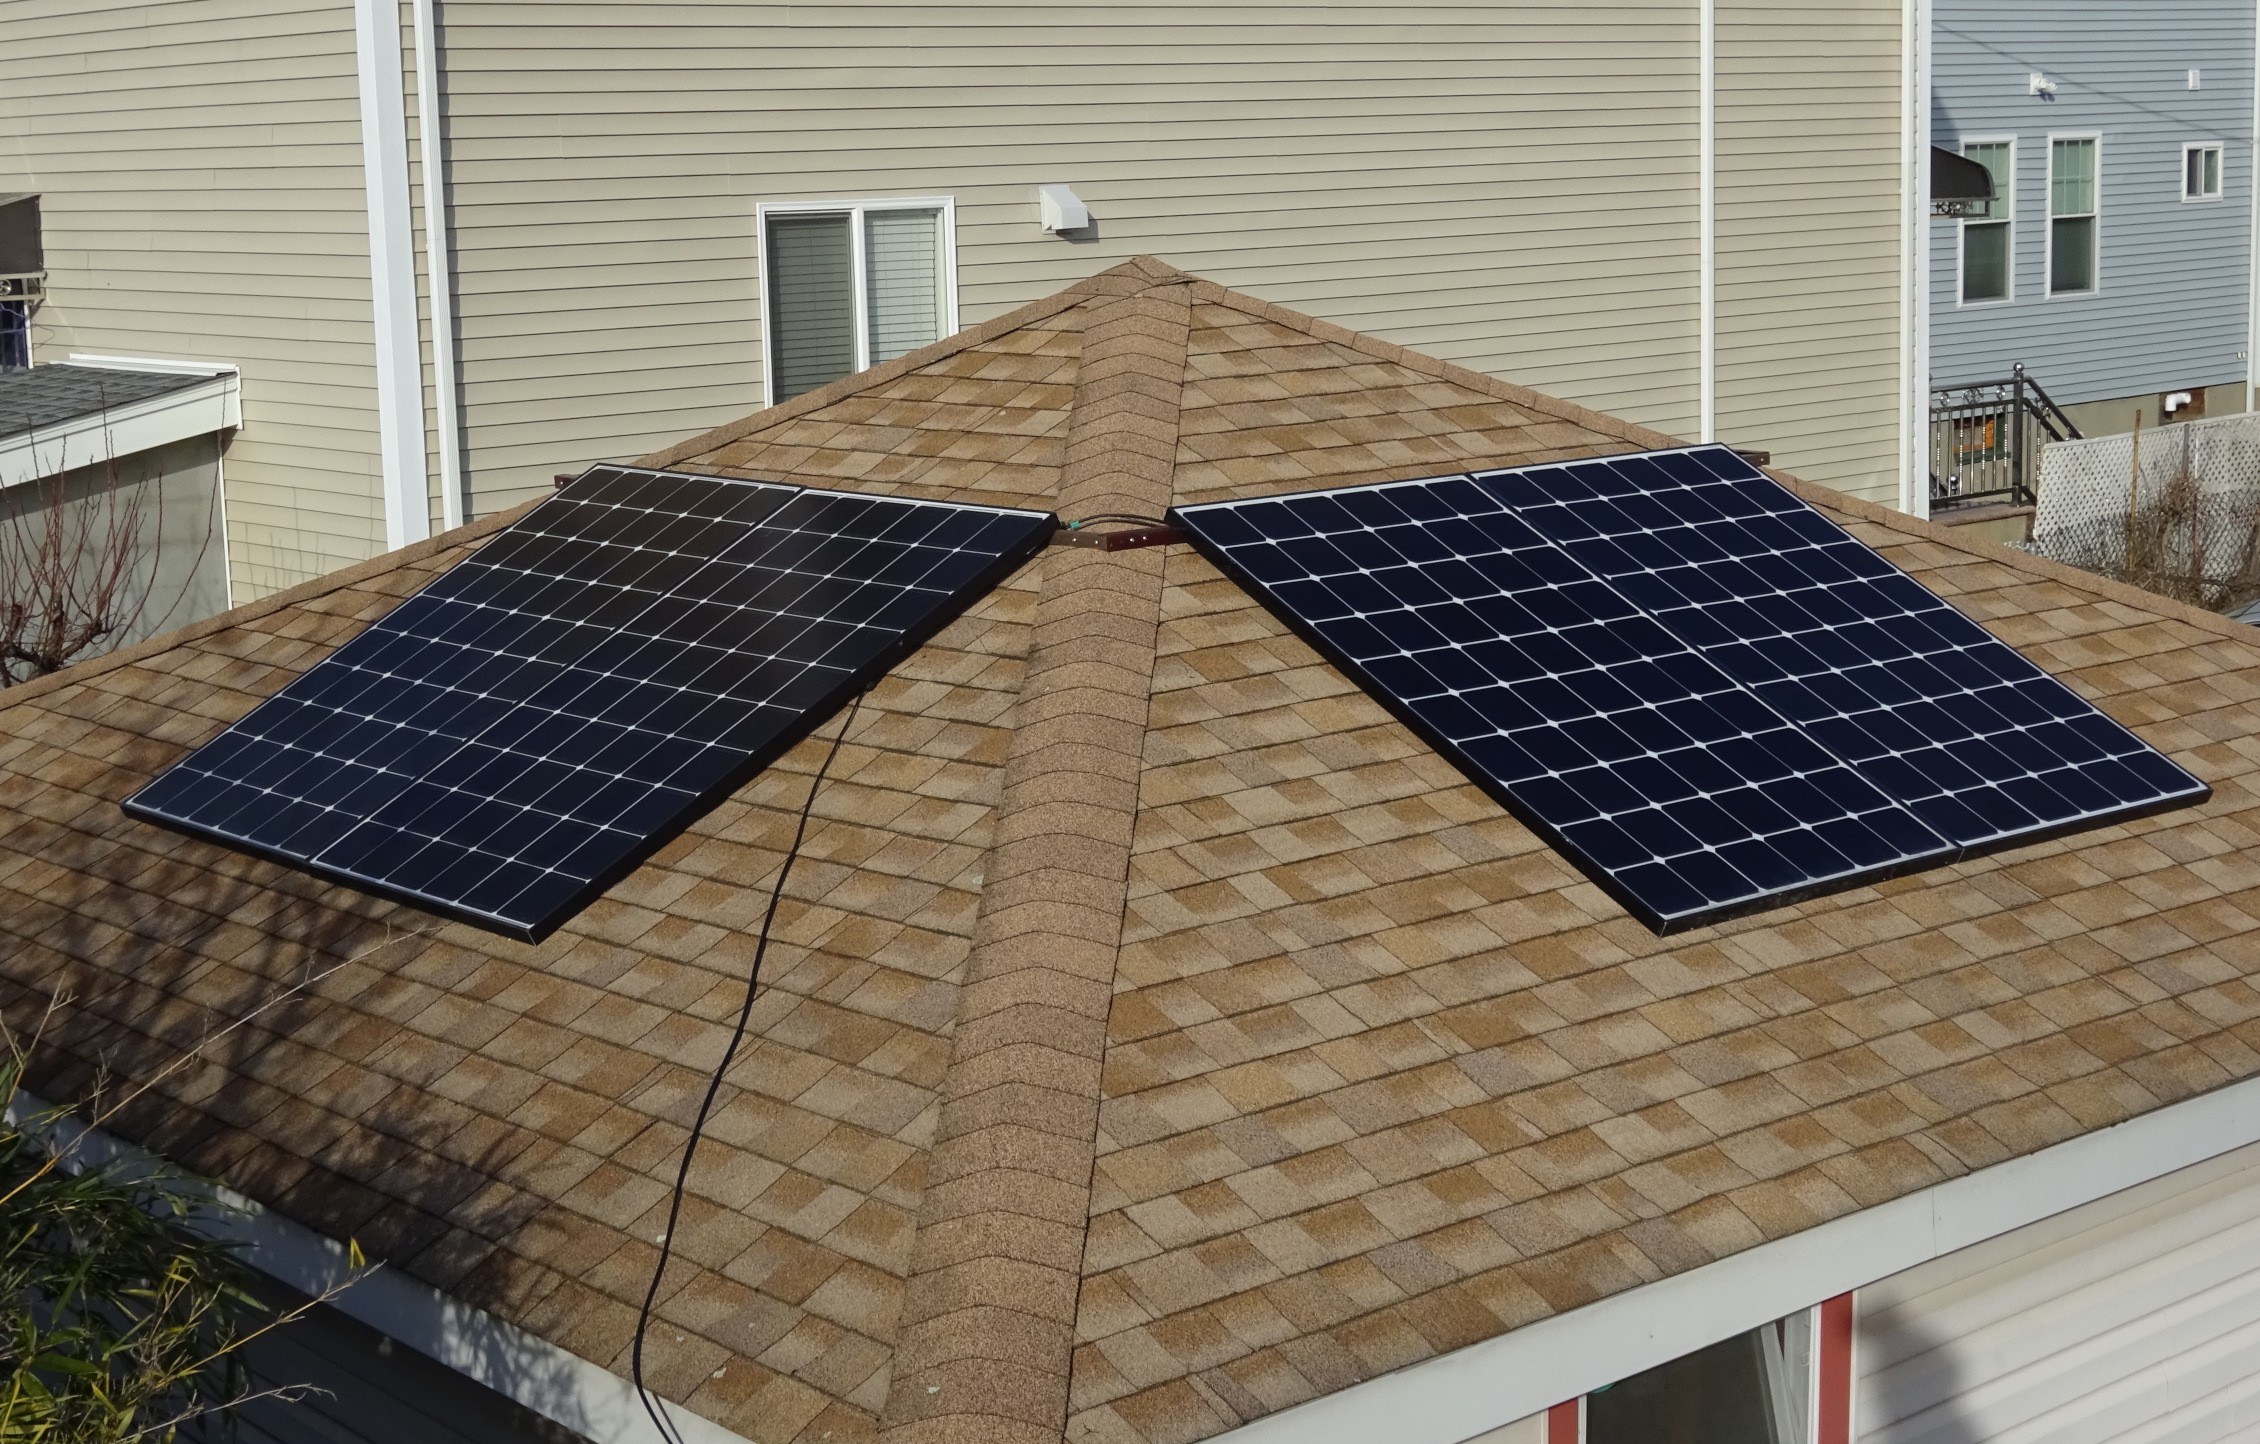
There is this small gazebo-like structure in the yard that we called the Little House. My grandfather built it when my mom was a kid, and one roof replacement later, it's still standing. I decided to put some solar panels on the roof to experiment with creating a slightly larger system than the one in my bedroom closet.
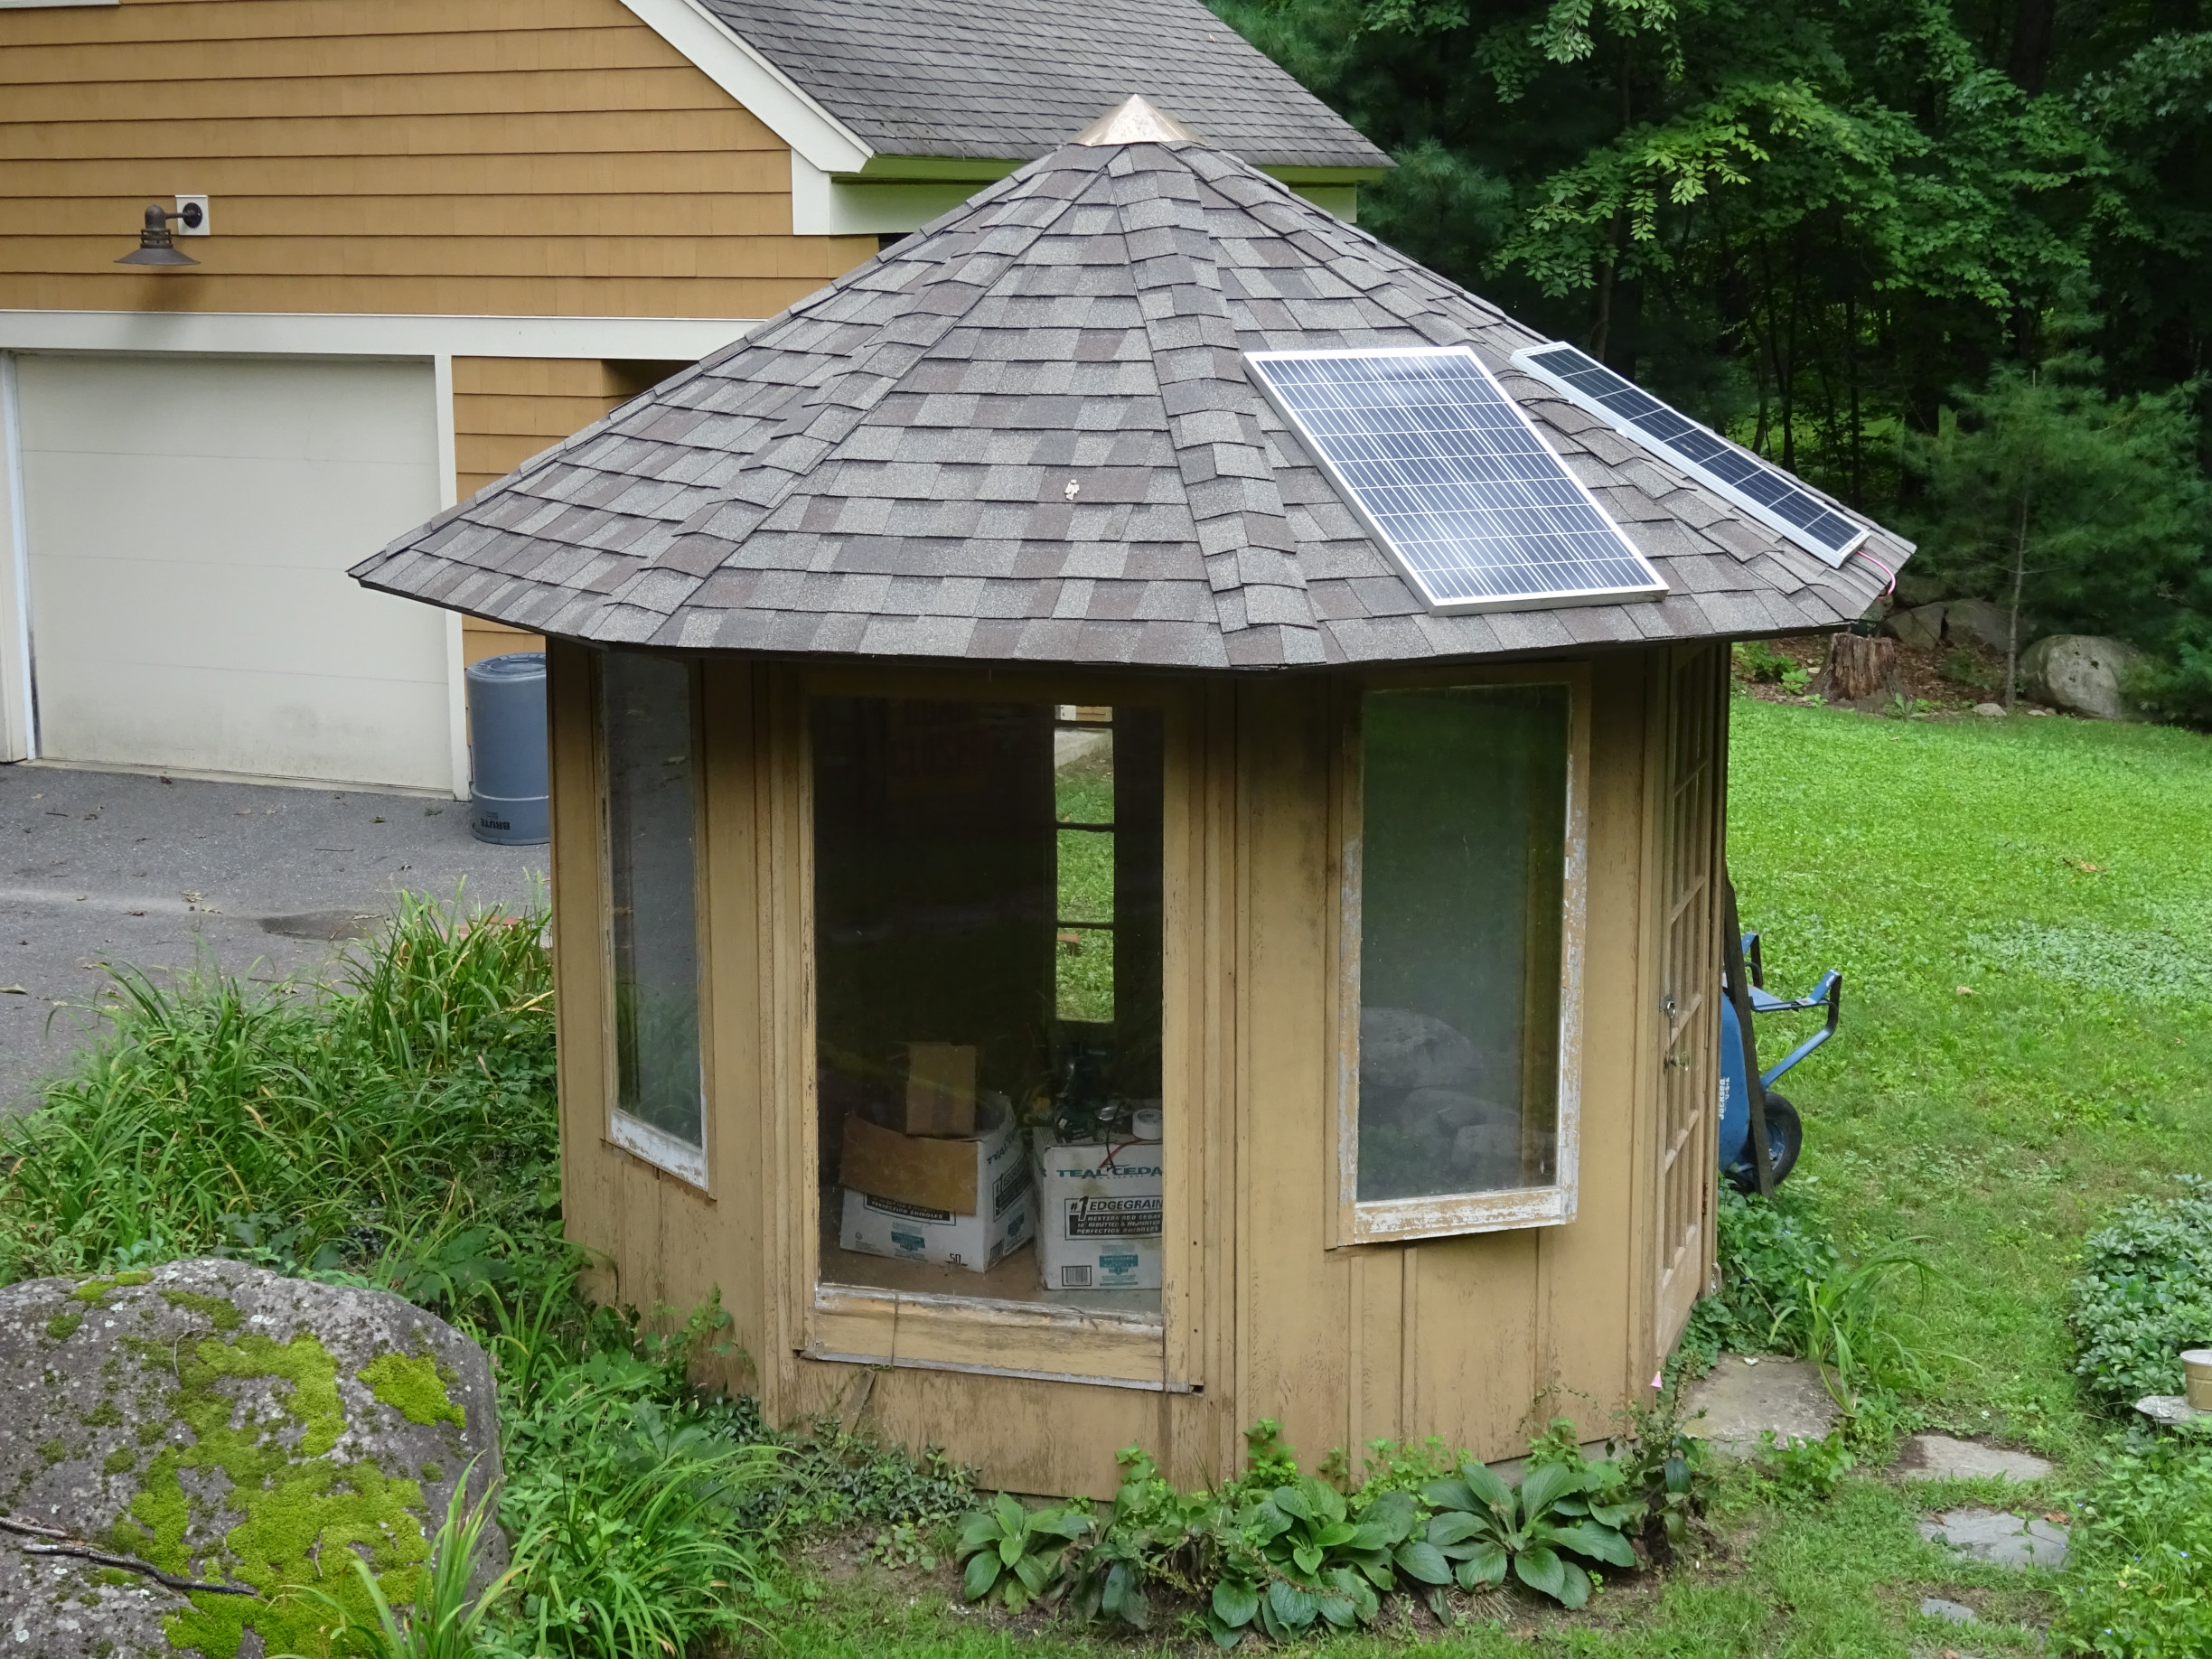
There are two 12v, 100w panels situated on two of the vaguely south-facing sides of the roof. From there, 8awg wires run inside to the rest of the components.
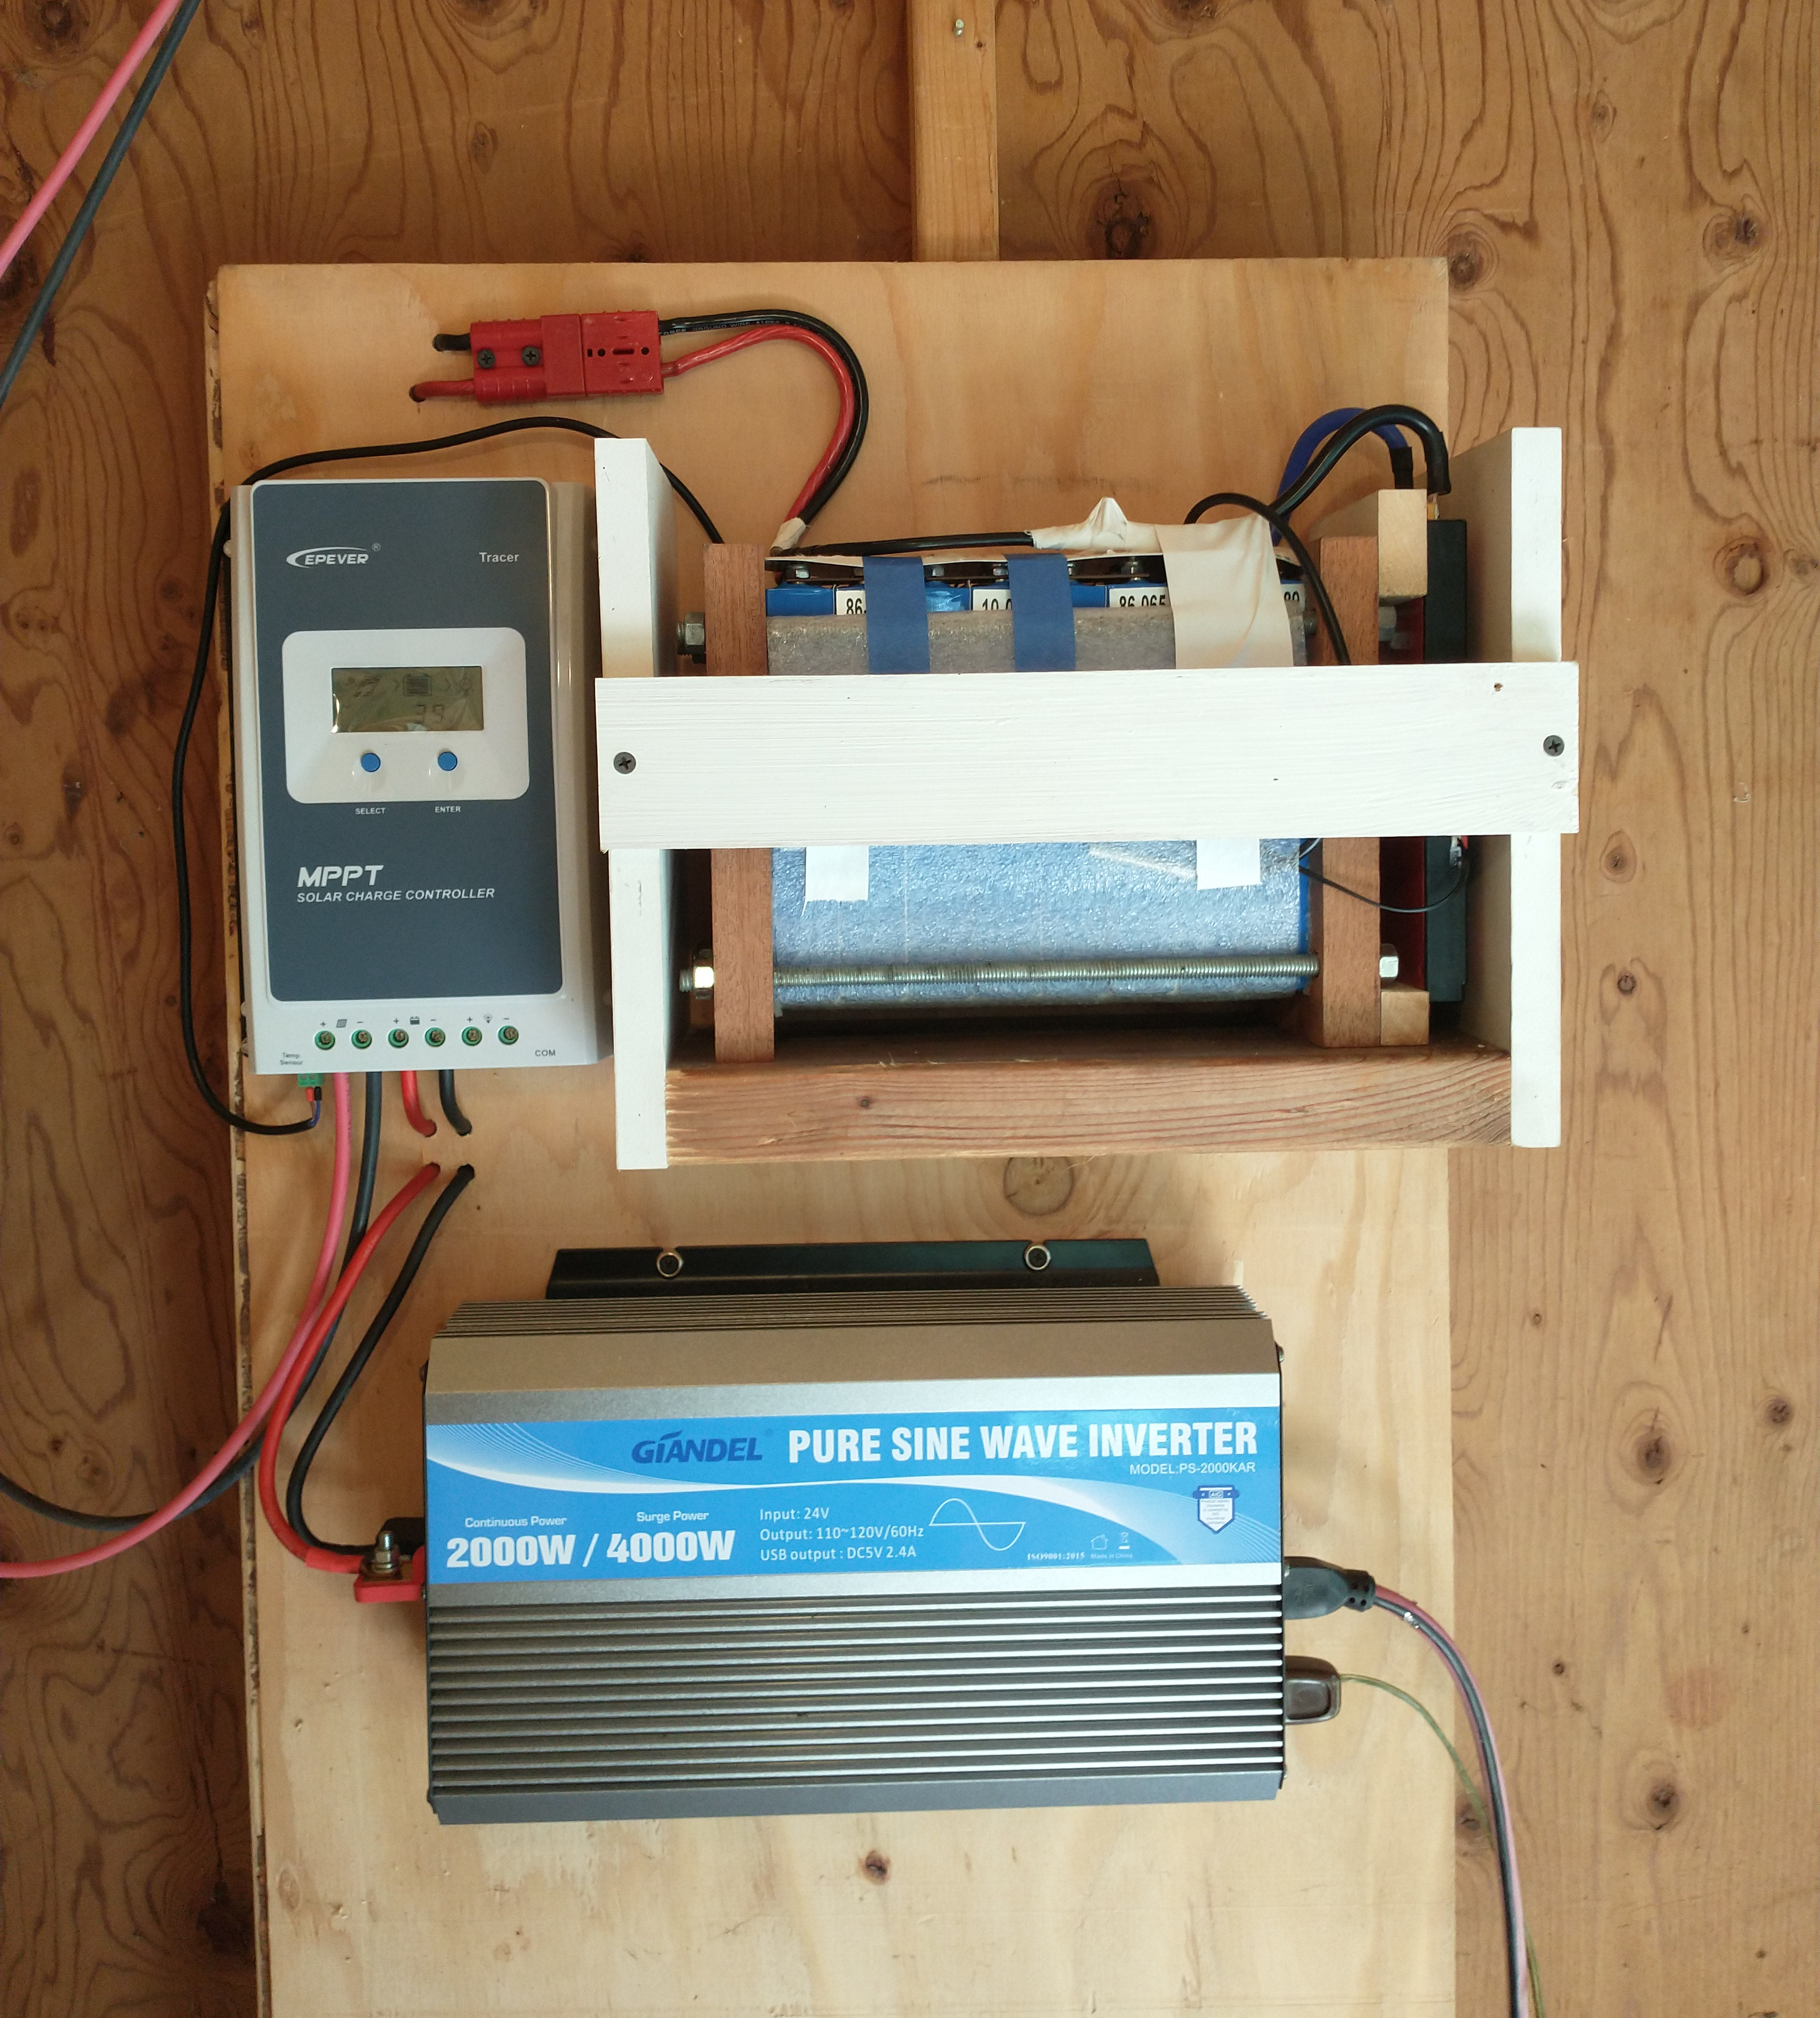
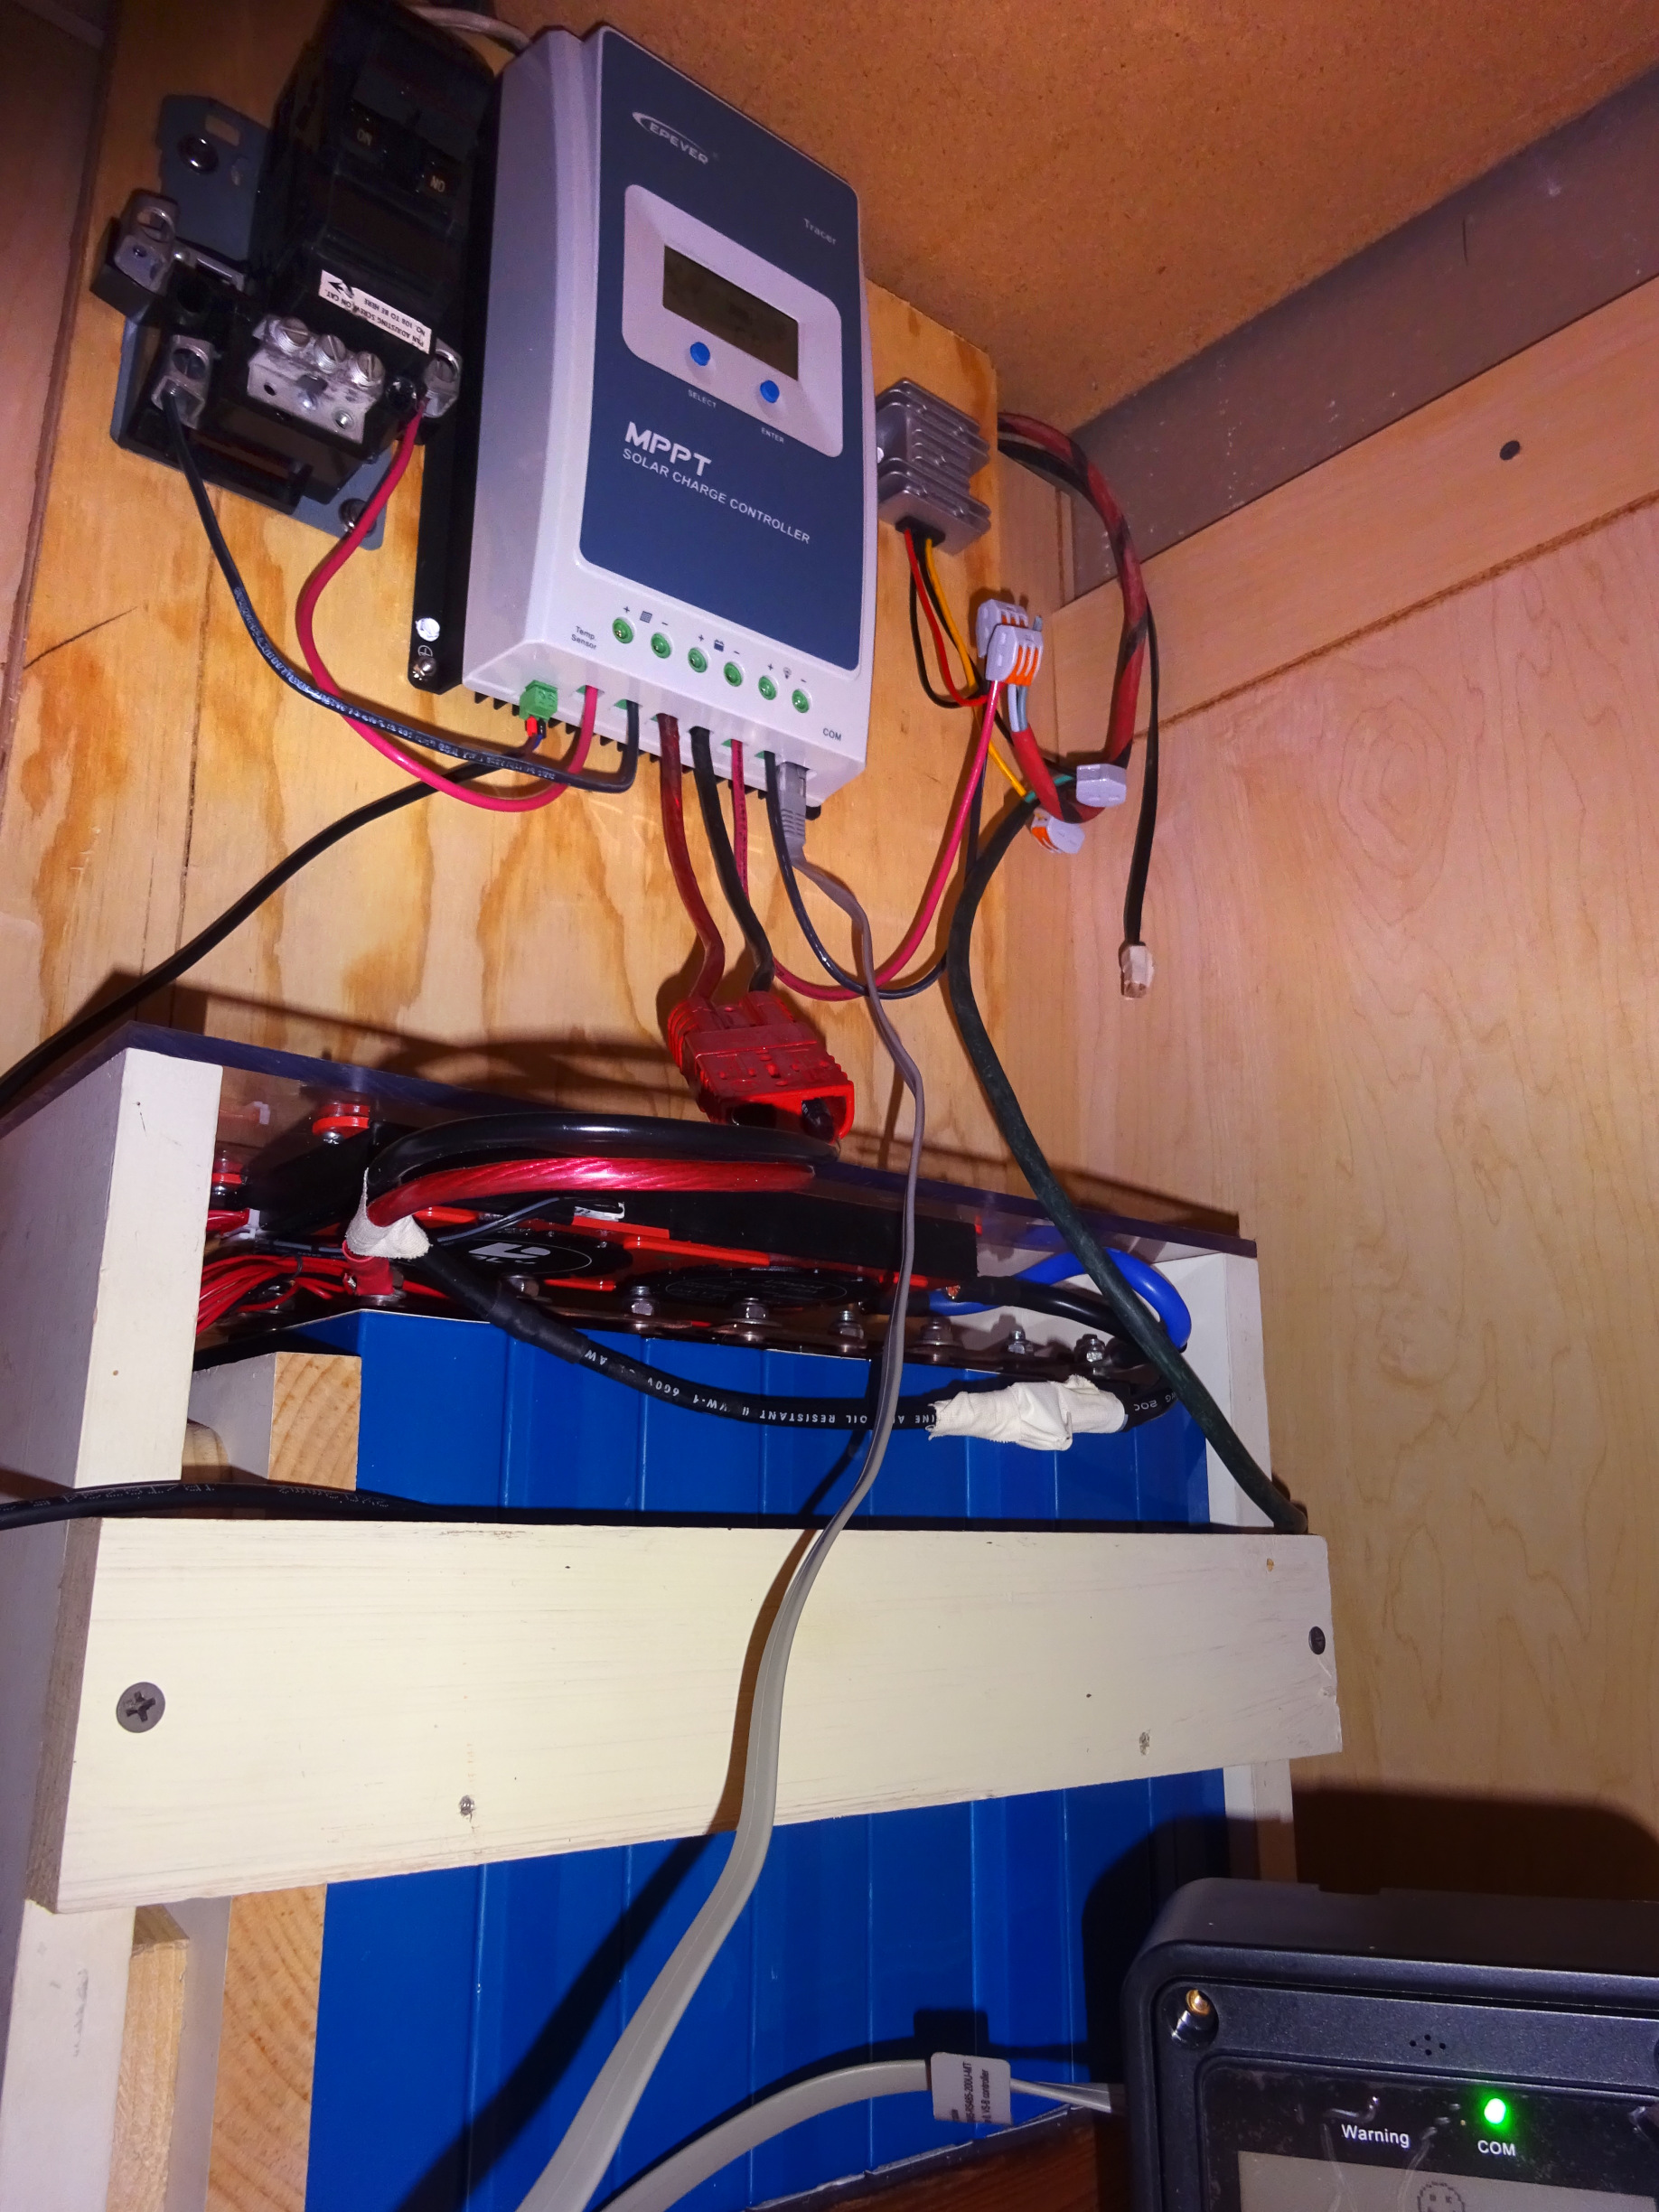
There is an EPEVER Tracer 40 amp charge controller, a battery comprised of 8 prismatic LiFePO4 cells in series and a Daly BMS, and a Ginadel 2000w inverter. There's also an MT50 info monitor temporarily hanging on the wall (not shown). Eventually, I hope to have this in the house so we can check the system's status without having to go out there, but that involves running more cable, so it's a project for later.
Epilogue
This system would eventually undergo several iterations, including a battery upgrade and moving into the basement, before the sale of the house meant I had to dismantle it. The parts, however, came with me, and they are alive and well in my apartment (see below).
Temporary Apartment Setup 
It probably goes without saying that the sale of my childhood home was a major life upheaval. Not only did I move to a new place but I had to empty the old one. So of course, that meant all the panels came down. But not one to be without my free sky power, I soon set up solar panels at the new apartment (thanks to our accommodating landlord!)
During my time working at a solar panel installation company, I managed to get ahold of a fair few old unwanted panels, four of which my roommate and I put to use. We constructed a frame from old bed frames so the panels could be mounted atop the garage without drilling any holes. The frame simply sits over the peak of the roof and the panels hang down. Despite gravity doing all the work, this arrangement has already survived some storms with pretty high winds.
A wire runs from the panels, along the back of the house, through a window, and through an existing gap into a cabinet in our kitchen, where the battery and charge controller from the Little House setup are stowed. From there I've snaked wires out to the four rooms of our apartment to power LED lighting and a handful of other loads.
Here are the gubbins in our cupboard. You can see the new battery I've built using bigger cells. For now, we aren't using the inverter, instead running the lights and charging our devices directly off DC. We've been experimenting with heat as well, but it takes so much more power than lighting that we can only really run a heater while the panels are in full sun.
Time passes...
Since writing this section, I have in fact moved again, but I've elected not to make a whole new section as the system remains mostly unchanged, save for the location. It's still essentially the same components, just arranged differently to fit the new apartment. My room is entirely lit with solar, and I've strung up nightlights through the halls and kitchen. At some point I need to revamp the power distribution so I can run my computer roo, but that's a me problem.